
Showing posts with label wool. Show all posts
Showing posts with label wool. Show all posts
Monday, May 7, 2012
Another Upcycled Sweater

Repurposing old into new seems to be my favorite thing to do as of late. Here is another project that my mother-in-law and I created for my daughter. We felted a wool sweater that we purchased at a second-hand store. You can find the instructions for felting wool here. To find step-by-step instructions on creating the bag, click here.

We used remnants from the sweater to create rosettes and hand hand stitched them onto the bag to add some embellishment. I thought it turned out so cute!

We had chosen a smaller sweater to create this bag...since it was for an 8 year old. The neck of the sweater, in its shrunken state, was now the perfect size for an 18-inch doll. We added some sleeves to create a dress for her American Girl and used the cuffs for the skirt.

To further utilize all the scraps, we also created a bag for her doll to match her own.

All in all, we created 2 bags and a dress from an upcycled sweater. The best part was my daughter's smile rewarding our efforts!


Wednesday, May 2, 2012
From Old Wool Sweater to Fashionable Bag Tutorial
Earlier this week I blogged about the steps taken to felt a wool sweater. You can find that tutorial here. I am now going to show you one of my favorite projects to use your felted wool sweater for. We are going to make a bag or a purse from our sweater. The great thing about these bags is they have a lot of "give" and tend to grow as you pile more and more inside.


Step #2: Cut the neck band and the sleeves off, as shown below.

Step #3: Take one of the sleeves (removed in step 2) and cut it open at the seam line, cut off the cuff.

Step #4: Place your opened sleeve below the bottom of the sweater and cut it to be approximately the same length.

The sweater will actually get folded side seam to side seam and the bottom will be added.

Step #5: For this particular bag, I chose to add a pocket which I created out of the cuff and bottom of the sleeve. I pinned this into place and top stitched.

Step #6: With right sides together, pin the opened sleeve to the bottom of the sweater and stitch. Repeat on the opposite side.

Step #7: Finish by closing the ends. This particular sweater was very thick...so I ended up having to hand stitch this one, as there is quite a lot of easing that must be done, which gives it a gathered look and more room to grow!

The finished product! Perfect fit for my iPhone.


This is a bag I had constructed a few weeks ago with rosette detailing made from the scraps of the sweater.

My daughter's sweater bag with rosette detailing.


Step #1: Felt the wool (instructions here). Felting the wool fuses the fibers together allowing it to be cut without fraying.

Step #2: Cut the neck band and the sleeves off, as shown below.

Step #3: Take one of the sleeves (removed in step 2) and cut it open at the seam line, cut off the cuff.

Step #4: Place your opened sleeve below the bottom of the sweater and cut it to be approximately the same length.

The sweater will actually get folded side seam to side seam and the bottom will be added.

Step #5: For this particular bag, I chose to add a pocket which I created out of the cuff and bottom of the sleeve. I pinned this into place and top stitched.

Step #6: With right sides together, pin the opened sleeve to the bottom of the sweater and stitch. Repeat on the opposite side.

Step #7: Finish by closing the ends. This particular sweater was very thick...so I ended up having to hand stitch this one, as there is quite a lot of easing that must be done, which gives it a gathered look and more room to grow!

The finished product! Perfect fit for my iPhone.


This is a bag I had constructed a few weeks ago with rosette detailing made from the scraps of the sweater.

My daughter's sweater bag with rosette detailing.

The bag used to make this tutorial is available for sale for a price of $25, as well as the green bag with rosettes. I have several more in the works, if you are looking for a particular color just ask. If you'd like me to repurpose a special sweater of your own, I'd be happy to work that out with you.
Hope you enjoy! If you have any questions, please don't hesitate to ask!
Happy sewing!
Linked to: Someday Crafts, Trendy Treehouse, Sew Much Ado, Sugar and Dots, Polkadots On Parade
Linked to: Someday Crafts, Trendy Treehouse, Sew Much Ado, Sugar and Dots, Polkadots On Parade
Tuesday, May 1, 2012
Felting Wool -- Upcycle Sweater Tutorial
Do you have an old wool sweater that you just can't bear to part with? Maybe for sentimental reasons, or maybe you just love the pattern/colors? Don't despair! There are so many fun things you can do with that sweater to repurpose it...bring it back to life! Today I will show you how I felt old sweaters. I use sweaters from my own collection or those I have purchased at the second-hand store. Felting is fusing the fibers of the wool together so they don't unravel when cut (sweater must be 100% wool).
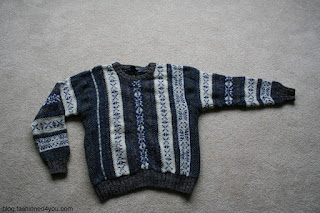
Step #1 ~~ Select the sweater you wish to felt. Below is the one I chose.
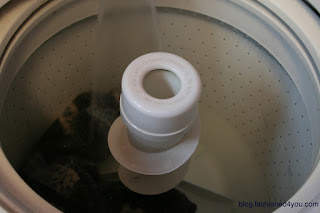
Step #2 ~~ Wash the sweater in HOT water. I use detergent as well, just to ensure it is nice and clean.
Step #3 ~~ Dry the sweater on high heat in the dryer.
Step #4 ~~ Wash in hot water again.
Step #5 ~~ Dry again.
Here is the end result!
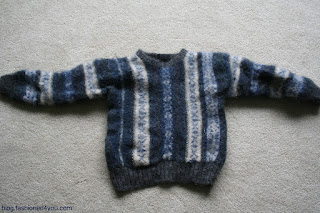
Your wool sweater is now felted and ready for a new purpose! I will be posting some fun, cute ways to use felted sweaters in the coming days here on my blog. Be sure to check back!!!
A few points to remember:
1. I have found at second hand stores that most of the wool sweaters have already been accidentally tossed in the washer and/or dyer....thus shrinking it and resulting in its arrival at the resale shop. If this is the case, you may only have to wash/dry one time.
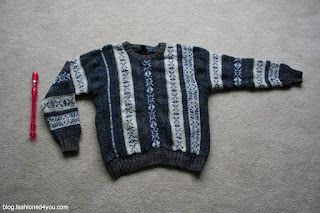
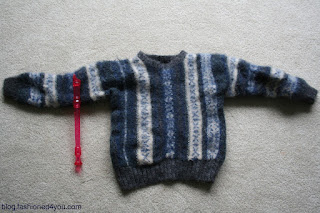
2. As you can see below, these sweaters will shrink considerably! I put a recorder in the picture to depict how much smaller it does get after washing and drying. Depending on the intended purpose...be sure to choose sizing carefully! I almost always go for at least a women's large or extra large.
3. You must use a 100% wool sweater in order for the fibers to fuse properly to prevent unraveling when cut.
4. If your sweater has a musty smell or smells of moth balls (I had one of these recently that smelled up the whole house!!) just pour 1/2 cup of vinegar in with the washing. That should take care of that!
Step #1 ~~ Select the sweater you wish to felt. Below is the one I chose.


Step #2 ~~ Wash the sweater in HOT water. I use detergent as well, just to ensure it is nice and clean.

Step #3 ~~ Dry the sweater on high heat in the dryer.
Step #4 ~~ Wash in hot water again.
Step #5 ~~ Dry again.
Here is the end result!

Your wool sweater is now felted and ready for a new purpose! I will be posting some fun, cute ways to use felted sweaters in the coming days here on my blog. Be sure to check back!!!
A few points to remember:
1. I have found at second hand stores that most of the wool sweaters have already been accidentally tossed in the washer and/or dyer....thus shrinking it and resulting in its arrival at the resale shop. If this is the case, you may only have to wash/dry one time.
2. As you can see below, these sweaters will shrink considerably! I put a recorder in the picture to depict how much smaller it does get after washing and drying. Depending on the intended purpose...be sure to choose sizing carefully! I almost always go for at least a women's large or extra large.
3. You must use a 100% wool sweater in order for the fibers to fuse properly to prevent unraveling when cut.
4. If your sweater has a musty smell or smells of moth balls (I had one of these recently that smelled up the whole house!!) just pour 1/2 cup of vinegar in with the washing. That should take care of that!
Before Felting

After Felting

Linked to: Not Just a Housewife, Hope Studios
Subscribe to:
Posts (Atom)